The Legend of the Broke Dragon Slayers: A D&D 5e Adventure for High Level Characters
May 15, 2021
This one-shot adventure for Dungeons & Dragons 5e can be run for 4 or 5 level 12 to level 14 characters (difficulty will vary with number of players, character level, and player experience—Challenge Ratings are based on 5 level 12 characters). The adventure typically takes 2 to 4 sessions.
Incorporate this into an ongoing campaign or have the players create new characters especially for this adventure. If new characters are created, each character should have the title “Dragon Slayer” or “Slayer of Dragons,” such as Jessica the Dragon Slayer, or Milo, Slayer of Dragons!
This adventure requires setting up a specific scenario, so it begins with a bit of a railroad (forcing the players into a predetermined storyline). But once the mission is set and the introductory travel is complete, the players are dropped into a sizable sandbox dungeon where they can explore with free will and tackle the challenges in any way and any order they choose.
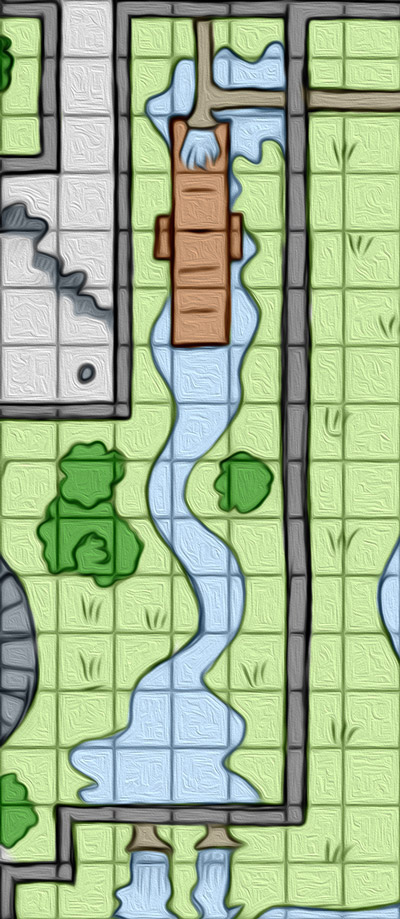
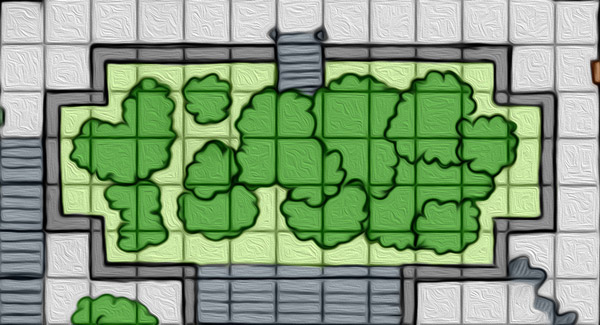
Map
Click map to view full-size.

Instructions
Read each area description to the players as they explore the dungeon. If possible reveal the areas on a physical or virtual game board as each location is discovered.
Text in light blue boxes is information for the DM only, as is any italicized description text in parenthesis.
Some sections are preceded by a bold and italicized "Condition" header, which identifies the following description as conditional to something in game.
D&D book references are abbreviated and cite page number for quick reference. For example:
- PHB 14: Player’s Handbook 2014 edition, page 14
- DMG 189: Dungeon Master’s Guide 2014 edition, page 189
- MM 303: Monster Manual 2014 edition, page 303
- XGTE 137: Xanathar’s Guide to Everything, page 137
Most room descriptions assume a specific entry point. However, it is also possible for the adventurers to enter some rooms from another direction. Adjust room descriptions as necessary. Be ready to adapt during game play to fit the actions of the players appropriately.
Prep
Each character can start with:
- Any non-magical equipment they can carry unburdened.
- Any one magical item, excluding Legendary magic items.
- Any one potion.
- A single +1 magical weapon.
- No mount.
- No money.
On a whiteboard, sheet of paper, or text document, write down the following information so all can see. Ask if any of the players want to volunteer to be bookkeeper for the sessions.
- Record each player’s name, character’s name, race, class, max HP, AC, and Passive Wisdom.
- Start a record of discovered areas.
- Start a record of items acquired by the party.
Suggested Rules
Encourage a turn order for each player to take actions.
Initial turn order can be determined alphabetically by the character’s first names, an initiative role, or other means. During each combat initiative the turn order will change. After combat, keep the modified turn order until the next initiative.
Players must use their turn, including forfeiting movement, when they want to search an area for items or secret doors and make a successful Investigation DC 12 check (unless noted otherwise). If no player takes the search action, the information listed under "search" for the room should be omitted.
Any essential items, specifically the 4 cogs and keys, are found automatically without a successful Investigation check when searching the appropriate room.
This mechanic can result in characters wandering away while their companions search, which can lead to interesting outcomes as the party becomes dispersed across the castle. The sandbox is small enough that crying for help should send everyone who wandered off running back, usually.
Short rests are allowed while crawling the dungeon but may be interrupted by wandering monsters. Long rests should NOT be allowed in order to keep the adventure moving and challenging. Explain that the story is meant to take place over a single night.
Use the optional Variant: Encumbrance rules (PHB 176) to limit the amount of equipment each character can carry. This will encourage players to make strategic decisions about what to pick up and what to leave behind.
Avoid unlimited ability checks. For example if a player fails to knock down a locked door, they are simply not strong enough. The same player is unable to try again; they must find a key or alternative means to open that door. This will encourage players to think creatively and problem solve.
Objective
To unlock the Throne Room and defeat Haze Bringer. The Throne Room is unlocked by repairing, oiling, and adjusting the East Tower and West Tower mirror lens’ mechanical positioning apparatus, in order to reflect moonlight onto the crystal top of the Pyramid.
The Pyramid’s crystal top absorbs moonlight and transfers energy to a large crystal at the center of the Pyramid which then feeds energy to a magical lighting system routed throughout the Pyramid, the keep’s east wing, and the keep’s west wing. The crystal, once activated, can also be touched to draw energy, by both players and monsters.
Once both towers are activated an Iron Golem is awakened in the Pyramid guarding the Throne Room where Haze Bringer the dragon awaits.
Notes
- Storm Spire is under a powerful spell controlled by Haze Bringer which prevents the sun from rising, keeping the castle fluctuating between twilight and starlight.
- Storm Spire is subject to the Regional Effects of a Red Dragon’s lair (MM 99). Small earthquakes are common, water is supernaturally warm and tainted by sulfur, and portals to the Elemental Plane of Fire can open at any time.
- The secret to unlocking the throne room can be obtained from the NPCs Eraket, Brooke, Tangor, or Ravendor or can be learned through research in the Library or Laboratory.
- Identifying magic items & attunement: DMG 136.
Regional Effects & Wondering Monsters
Intermittently in each area, roll a d100 for the following:
- 1-30: A small earthquake shakes the ground.
- 31-50: Lava erupts from the ground nearby, Dexterity DC 12 saving throw or take 3d6 damage, no damage on a successful save.
- 51-60: A portal to the Elemental Plane of Fire opens, a Fire Elemental (MM 125) emerges.
- 61-80: A portal to the Elemental Plane of Fire opens, a Salamander (MM 266) and 1d6 Fire Snakes (MM 265) emerge.
- 81-90: 1d10 Flame Skulls (MM 134) fly at the adventurers.
- 91-100: Eerie silence.
Keys & Essential Items
| Brass Key | Opens the Observatory hatchway, found in a puzzle cube in the lower Observatory. |
| Small Wood Key | Opens the Living Quarters, found in the Courtyard Grove. |
| Old Bronze Key | Opens the Kitchen, found in the Living Quarters. |
| Red Stone Key | Opens the Dining Hall, found in the Graveyard. |
| Purple Steel Key | Opens the Laboratory, found in the West Courtyard. |
| Bone Key | Opens the Royal Chambers, found in the Library. |
| Blue Steel Key | Opens the East Tower, found in the Hedge Maze. |
| Orange Copper Key | Opens the West Tower, found in the Gardens. |
| Small Blue Steel Cog | For the East Tower’s machinery, found in the Library. |
| Large Blue Steel Cog | For the East Tower’s machinery, found in the Upper Courtyard. |
| Small Orange Copper Cog | For the West Tower’s machinery, found in the Outer Courtyard. |
| Large Orange Copper Cog | For the West Tower’s machinery, found in the Pyramid. |
Non-Player Characters
| Beatrice | The barmaid at The Dusty Ogre. |
| Raina Storm Crow | Descendant of Queen Niah Storm Crow, steward of Storm Spire. |
| Haze Bringer | Dragon tyrant of Storm Spire. |
| Pippin | Bellboy at The Dusty Ogre. |
| Ilk | The chauffeur to Storm Spire, commissioned by Raina Storm Crow. |
| Bogart | The innkeeper at The White Griffin in MoRatch. |
| Eraket | A Dwarf that likes to hangout in the Hot Springs. Brooke’s brother. |
| Brooke | A Dwarf that can often be found working the Smithy. Eraket’s sister. |
| Tangor | A Kobold unwillingly under the command of a bunch of mean ogres. |
| Grog | Leader of a bunch of mean ogres. |
| Ravendor | Archmage working for Haze Bringer, but not necessarily loyal to him. |
And now the adventure begins... Somewhere...
Somewhere...
In the last few years competition in the dragon slaying business has increased and dragons to slay have become scarce. Each of you has taken on menial jobs much below your stature: annihilating goblin infestations, rescuing incompetent monarchs, and even washing dishes in dusty old taverns.
Yet just the other day an intriguing lead came your way. Perhaps your career as a dragon slayer hasn't ended after all? A messenger wearing funny pants and a top hat delivered you an anonymous letter. In minimal detail the letter offered a sizable reward to slay a powerful dragon. The letter read:
Most Esteemed Dragon Slayer,
I humbly request your services in the dispatching of several nasty creatures and a grumpy old dragon. You will be handsomely rewarded for your heroism. Travel to The Dusty Ogre in Mapplewood with all due haste. I will meet you there to discuss details, expenses, and compensation.
Yours Truly, X
P.S. Apologies, but my identity must remain concealed until we meet, perish the thought that this correspondence falls into undesirable hands.
The Dusty Ogre
Your adventure begins in the dimly lit backroom of an inn called The Dusty Ogre. The inn is located in the small town of Maplewood. You sit glaring across a rough wood table at your direct business competition. These dragon slayers are the ones that have been putting you out of business! How dare they move in on your territory.
The air is thick and musty. Each of you is about ready to pounce on your adversaries but you hesitate, can you really take on several other dragon slayers of your caliber at once?
The barkeep (Beatrice) enters. The tension in the room is so thick it could be cut with a knife. She mumbles with a wavering voice, “Maybe some refreshments to settle your nerves?” You are completely broke and hesitate to order anything. Now seems like as good of a time as any to introduce yourself.
Moments later a woman dressed in a dark red robe cautiously enters the back room. She pulls down her hood to reveal a beautiful complexion and long curly blonde hair.
She says, “Thank you each for coming. My name is Raina Storm Crow. I am in need of your expertise and I’m prepared to compensate you more than adequately. I can tell you don’t like each other but believe me, your only chance of succeeding in this task is to work together. Here I propose a dangerous mission and many of you may not survive. If you are not afraid of death, seek riches, and wish to know more, state so now and we shall proceed.”
“Your reward will be generous but the price may cost you your life.” She emphasizes the word life with a cruel twist to it. “If this is acceptable, stay and I will reveal the details. Barkeep! Bring these heroes a pitcher of ale and a bottle of your finest wine!” You see her slip the barkeep several gold pieces before turning back to face you. Momentarily bread, cheese, ale, and wine is placed on the table in front of you. You haven’t eaten in days.
Raina Storm Crow looks at each of you in turn with a cold, serious stare. “I am the direct descendant of Queen Niah Storm Crow.” She pauses to reveal an ornate jewel encrusted signet ring bearing the Storm Crow’s seal.
“Our realm was ruled from Storm Spire, a keep atop Mount Solace. My bloodline governed this land for over two thousand years. Three hundred years ago our realm diminished. A scourge of dragons descended upon my land, led by a powerful dragon, Haze Bringer. They infested Storm Spire, sending us fleeing, hoarding my family’s treasury. Since then Haze Bringer has added to the treasury with tribute from lesser creatures. The keep has rotted, becoming overrun with vile monsters which Haze Bringer keeps for amusement and protection.”
You’ve heard rumours of the dragon Haze Bringer during your travels but never met anyone who has survived to tell the tale. The lost legacy of the Storm Crows is well known to all, but few are old enough to confirm the legend. She continues:
“Your mission is to infiltrate the keep and unlock its secret—leaving no stone unturned. Then, using the magic within, clear out the monsters that infest the keep, and slay the dragon Haze Bringer. The keep is ripe with ancient relics, magical and mechanical, and houses treasures beyond belief. Defeat the dragon and you may take from the keep any relics you find and one bag of treasure. A kingly reward.”
A bag of treasure you think! This could be that one last big job that boosts you into retirement. Raina Storm Crow continues:
“The keep is a two day journey from here. I have arranged transportation and board. The first night you’ll stop in the city of MoRatch and stay in the finest suites at The White Griffin. From there you’ll head deep into the mountains, winding up the old road to the peak of Mount Solace.”
“Your rooms and meals have been paid for. You leave at first light. A carriage and driver will be waiting for you outside. As our final order of business, we must sign this contract in blood; to bind your commitment to slay the dragon in exchange for my offer of the riches within.”
Raina draws forth a scroll from her robes and reveals it to you. The scroll reads:
I, dragon slayer, commissioned by Raina Storm Crow, hereby pledge to retake the keep of Storm Spire, rid it of infestation, and vanquish the dragon Haze Bringer. In exchange I may use and keep any magical artifacts discovered within and one bag of treasure as compensation.
With your signatures scribbled in your own blood and dried on the scroll, Raina Storm Crow removes a small knife, cuts her finger, and signs below your names. She blows on the signature to dry it while sizing you up. You can see in her gaze that she isn’t sure if you are actually up to the task. She rolls up the scroll and turns to leave. Looking back over her shoulder she says, “Your errand will not be an easy one, but work together and you may have a fighting chance.” She leaves in a flourish as the barkeep brings hot meals and tells you about the bathhouses and fine beds that have already been paid for. You haven't had a proper bath in weeks.
MoRatch
You are awoken by the bellboy (Pippin) at the crack-of-dawn, offered a warm scone dripping with butter and honey and a cup of coffee. The bellboy tells you that a large carriage is waiting for you outside.
You meet the other adventurers outside the inn. A large black carriage pulled by six black horses awaits in the dim light of dawn. A gangly man almost seven feet tall steps down from the driver’s seat. He is dressed in a black suit and tails. Beady pupils stare at you from dark sunken eye sockets framed by a pale gaunt face. He opens the carriage door, turns his head to the side, and in a raspy whisper says, “All aboard.”
The carriage ride is slow, bumpy, hot, and dusty. By evening you roll into the city of MoRatch. The city is quiet and the shops are closed. The driver stops outside The White Griffin and opens the carriage door. The inn is the finest in the city and each of you have stayed here before during better times.
You are given executive attention, fed, bathed, and fall asleep soundly in the finest sheets.
The next morning the innkeeper (Bogart) wakes you up and says, “That spooky man that slept in the stables last night is waiting outside.”
You board the black carriage once again and depart.
About midday the carriage starts to gain elevation. As you climb into the mountain range the carriage navigates switch backs and large boulders that obscure the poorly maintained road. You pass under stone archways and cross sketchy wooden bridges hanging hundreds of feet above rivers raging through crevices below. Higher and higher you climb into the mountains, second guessing if this was actually a good idea.
At dusk the carriage moves east over a wide stone bridge before creaking to a halt. Peering out of the window you can see the silhouette of a massive castle in the distance. The driver opens the door and rasps, “Welcome to Mount Solace, home of Storm Spire.”
After dismounting the carriage the driver looks deep into your soul and hands you a small bell. “When your task is complete, return here and ring this bell.” With that he slowly climbs back into the driver’s seat and starts to move away across a second stone bridge to the east.
Mount Solace
You are surrounded by an epic snow covered mountain range, over ten thousand feet above sea level, with sheer cliffs in every direction. The air is thin and you find yourself catching your breath. The thought of the large carriage somehow navigating the eroding cliff-side below makes your stomach turn.
Storm Spire looms in the distance, about a half mile up a ruined cobblestone highway. As you move towards the castle the last light of the day dims in a spectacular show of red-orange clouds against a dark blue starry sky. Darkness slowly engulfs you as you walk the half mile up the road to the keep. Starlight and the silver-blue glow of one of the moons, EM-Star, illuminates the path before you. The tip of the second red-orange moon, AL-Star, fully waxed, can be seen starting to peak over the mountain range stretching east to west. A low mist clings to the icy ground, swirling around your feet in the subtlest of breezes. The air is chilly and you wish you had brought that wool sweater grandma knit you.
The highway ends at a giant drawbridge which sits lowered over a massive raging river-moat. The moat drains to twin rivers on the east and west of the bridge. The river-moat is 30 feet below the cliff’s edge. The drawbridge is 90 feet wide and stretches before you into the darkness. The forward walls of the keep are massive, reaching 150 feet into the sky.
As you cross the bridge you can start to make out a massive closed portcullis that sits silently in the stone wall, 90 feet wide and 90 feet tall.
Encounter
- Once the adventurers are about half way across the bridge each rolls a Perception DC 15 check. On success they detect 3 Wyverns atop the castle ramparts. The Wyverns dive in attack and surprise each player that failed their perception check.
- Wyvern (3), MM 303, Medium Difficulty (CR 15)
- HP: 94, 77, 80
- Tactics: The Wyverns attack from the air and try to stay out of melee combat. Surprised adventurers might get pinned down by a Wyvern or carried off the bridge into the air.
Search
- Small signet ring bearing the Storm Crow seal, rusty dagger, broken compass.
Connections
- North: Portcullis to the Outer Courtyard.
- East: The East Courtyard can be accessed via the waterworks drainage in the outer wall.
- South: Mount Solace.
- West: Secret Door around the outer wall. Investigation DC 12 or successful Passive Wisdom check to reveal a secret tunnel entrance between the moat and the wall connecting to the West Tunnel.
Actions
- The portcullis can be lifted briefly on a successful Strength DC 25 check.
- The portcullis bars can be bent enough for passage on a successful Strength DC 30 check.
- The portcullis and upper walls can be scaled with an Athletics DC 20 check.
- A rope (if long enough) and grappling hook can be anchored with an Athletics DC 12 check.
Notes
- On top of the wall two guard houses can be entered on the east and west, each of which contain large mechanical cranks for lifting the gate. A Strength DC 12 check is required to move the cranks, both cranks must be turned simultaneously to lift the portcullis.
Outer Courtyard
Inside Storm Spire the keep’s Outer Courtyard is stunning. The ground is paved but many of the flagstones have been pulled up, shifted, or cracked. The area looks as though it was once used as a massive outdoor bizarre. Crumbling shop stands, pavilion tents, and discarded goods litter the grounds. A large well stands half crumbled in the center of the courtyard amongst a few trees. Massive curving stairways wrap around the courtyard and climb to 50 feet where they meet a raised Inner Courtyard, which appears to lead into the interior of the keep. Along the castle’s inner walls the courtyard opens to grassy areas on the east and west, wrapping around the Inner Courtyard. A faint repetitive mechanical sound can be heard emanating from the east and the silhouette of a small tower can be seen to the west.
Search
- Wooden staff, spoon, 33 gold pieces, tub of lard, ratty cloak, fish hooks, broken armor, skull, pointed hat (Hat of Wizardry, XGTE 137), wooden crate full of bananas labeled “Poison” (Not actually poisonous), bottle of oil.
- A Small Orange Copper Cog wedged under a broken flagstone.
Connections
- North: Twin staircases to the Inner Courtyard.
- East: East Courtyard.
- South: Portcullis to Mount Solace.
- West: West Courtyard.
Actions
- The well appears to still be operable, with a bucket that can be lowered and raised, and the water smells fresh and clean.
Inner Courtyard
The Inner Courtyard is accessed via two massive curved stairwells climbing to 50 feet. Old moldy blue and green carpets run down the middle of the staircases. At the top, the stairs open into a large balcony, 150 feet wide and 40 feet across, which overlooks the Outer Courtyard to the south. The balcony is connected to a large oval pool about 200 feet wide and 30 feet across. The pool is made of small shiny black tiles that appear to have weathered with very little damage. The water is black and murky in the dim twilight. An arching bridge, 20 feet wide, anchored by ivory columns, and ornately carved with mystical creatures, allows crossing the pool.
Encounter
- Once an adventurer is about halfway across the bridge they roll a Perception DC 20 check. On failure they are surprised by 2 Giant Octopus, one on each side of the bridge.
- Giant Octopus (2), MM 326, Trivial Difficulty (CR 2)
- HP: 45, 64
- Tactics: The Giant Octopus attack from the water, trying to pull players into the water to drown them. Tentacles can grapple players in order to pull them underwater, at which point they must make an escape attempt. Their position underwater can be obscured by an ink cloud.
Across the bridge you enter into the castle’s Inner Courtyard. The Inner Courtyard is completely surrounded by 80 foot tall stone walls, save for the opening granted by the pool to the south.
A shallow stairway, 150 feet wide and 60 feet deep, stands directly in front of the bridge, raising only about 10 feet. At the top of the stairway you can see trees that form a small Courtyard Grove, surrounded by a third inner perimeter wall, 50 feet high. To the east you can vaguely see a crumbling statue of a dragon in front of a sheer 40 foot stone cliff.
To the west a crumbling stairway wraps around a huge oak tree following the west perimeter of the Inner Courtyard wall.
Search
- 45 copper pieces, string (10 feet), canvas (15 square feet).
- Inspecting the crumbling statue reveals a small hidden compartment at the bottom containing a note. Reaching into the compartment triggers a poison needle trap. Dexterity DC 15 saving throw to avoid taking 1d6 piercing damage then 1d6 poison damage each turn for 3 turns. The trap can be detected if the player inspects the compartment and makes an Investigation DC 15 check. The trap can be avoided by using a tool to reach into the compartment or by other means.
Connections
- North: Staircase to the Courtyard Grove.
- South: Outer Courtyard.
- West: Crumbling staircase to Upper Courtyard. Attempting to ascend the crumbling stairway causes it to crumble underfoot. Acrobatics DC 15 check to leap to the edge of the staircase as it falls away. Anyone failing the check takes 4d6 falling damage.
Condition: If the note is retrieved and Ogre can be read.
Ravendor, I’ve barred the Pyramid as instructed. Nothing is getting in that way. I’ve also set up a few traps to keep the locals out. I’ve been hearing some strange noises coming from the Hot Springs and Smithy, probably those pesky dwarves sneaking about again. I’ll be keeping an eye on it. Hopefully Tandor will be cooking them into a stew before they cause any more mischief.
– Grog
East Courtyard
The East Courtyard is made up of a few trees surrounded by dead grass and a wide river flowing from north to south between the castle’s outer walls (150 feet high) on the east and the Inner Courtyard walls (100 feet high) on the west. The river drains out of the castle through two large drain pipes, pumping hundreds of gallons of water a second.
As you explore northward along the bank of the river you find a massive water wheel (120 feet in diameter), powered by an advanced plumbing system. The water flows in via a pipe from the east, raised 30 feet in the air. Water falls from the intake pipe onto the water wheel, causing it to slowly churn. There is a small pump house at the foot of the water wheel with several large copper pipes that plumb into the castle. The building to the north appears flooded and water can be seen seeping from the stones and spraying out of holes and broken pipes. The pool below the wheel smells of sulfur and is warm to the touch.
Search
- Finely crafted longsword (Magic Weapon +3), iron pry bar, block and tackle, strange yellow potion (Potion of Clairvoyance, DMG 187).
Connections
- West: Outer Courtyard.
Actions
- Destroying or stopping the water wheel causes the flooding in the Living Quarters to stop. Some options may include:
- Strength DC 20 to break the water wheel.
- Strength DC 15 to jam the water wheel with the pry bar (or similar object).
- Intelligence DC 18 to disassemble the core water wheel mechanics.
- 48 HP of damage, AC 15, to destroy the water wheel.
- Strength DC 20 to break the pipes leading to the Living Quarters.
- 28 HP of damage, AC 19, to destroy the pipes leading to the Living Quarters.
West Courtyard
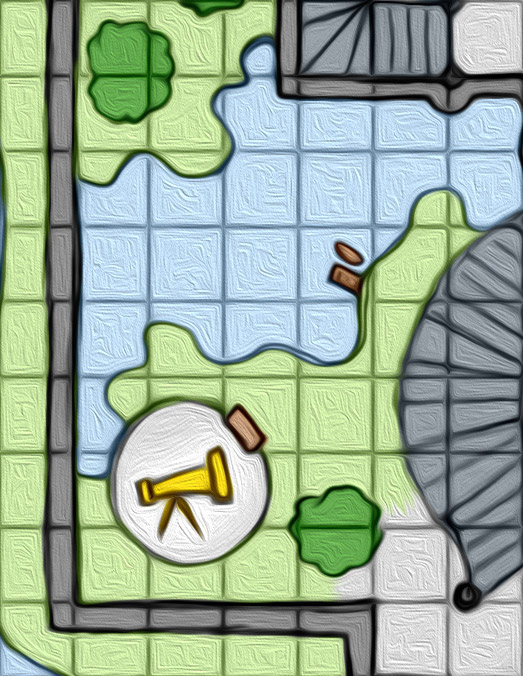
The West Courtyard features a huge hemlock tree and a mossy green stone tower tucked behind it (the Observatory). Beyond the hemlock you can see a shallow flooded pond (12 feet deep) that stretches across what was once an open field. A rickety rowboat is tethered to a small crudely constructed dock. Something is glowing on the other side of the water.
Search
- Old rope, broken oar, skull, basket of walnuts.
- Letter written in Goblin, wrapped in the letter is a Purple Steel Key.
- Searching the boat reveals text in common etched onto the side, "Speak only your location and water will grant you passage." (The password to proceed past the water elementals is "Storm Spire" or "Mount Solace", see Courtyard Orchard.)
Connections
- Observatory.
- North: Courtyard Orchard.
- East: Outer Courtyard.
Condition: If the letter written in Goblin is found and can be read.
Hey Grog, you get the oil delivered to the Observatory? Ravendor is in one of his moods. Also, he misplaced the Purple Steel Key in the orchard again. Please make sure he gets it.
– Tangor
Observatory
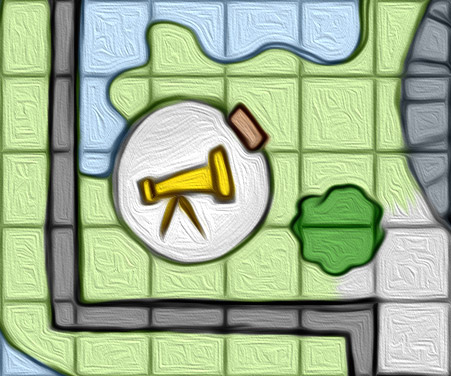
The lower portion of the observatory tower is unlit and has a faint mildew smell.
A counterclockwise spiral staircase with no handrail wraps around an open central room. The stairs are slick with damp moss. The staircase ascends several hundred feet where a small hatchway can be seen at the very top of the stairs (locked).
Notes
- Hatchway to Observatory turret is blocked: openable with the Brass Key, a Strength DC 15 to force open, or a Dexterity DC 15 to pick using Thieve’s Tools.
Search (Lower Observatory)
- Broken furniture, small barrel of oil, old hay, 3 gold pieces, rusty longsword, strange bottle of greenish liquid (Potion of Water Breathing, DMG 188), puzzle cube (Insight DC 15 to open, contains a Brass Key to the Observatory hatchway).
Condition: If the hatchway is accessed.
- The Observatory turret is crowded with dusty mechanical devices, drafting tools, and star charts. 3 stone beams in a tetrahedron pyramid support a glass ceiling and 360º of glass windows. The windows are formed by small hexagonal glass panes which have been expertly assembled. A large seated telescope, covered in cobwebs, sits in the center of the room. A series of large gears appear to connect the telescope to a rotating platform. Four large cranks, black, blue, orange, and yellow, sit at the edge of the platform. (The gears are stuck, and the telescope is currently pointed at the starry sky).
- Looking out from the tower you are humbled by the vast skyline and the two moons. You can see MoRatch at the foot of the mountains to the south and the castle’s cascading courtyards sit directly below you. A large pyramid, barely illuminated by the moons, sits at the center of the castle behind the Inner Courtyard. Two prominent towers stand on the east and west of the Pyramid. Across the flooded pond something is dimly glowing.
Search (Observatory Turret)
- Small tools, drafting equipment, parchment paper, ink pens, paper weight (Weight of Grounding: magical, AC +1), star charts, hand pumped oiler (half full), kerosene lantern (half full), goggles (Goggles of Night, DMG 172), an old bird cage, a blue pointy hat, pocket watch, mechanical lighter, water skin (containing stale wine).
Actions
- Strength DC 15 to unstick each crank (Strength DC 10 if oiled).
- Insight DC 15 or Investigation DC 15 to understand how to use the gears to orient the telescope.
- Cranking the black crank zooms the telescope in or out.
- Cranking the blue crank focuses the lens, the lens is initially focused on the starry sky.
- Cranking the orange crank rotates the telescope platform, including the seat, in a horizontal circle.
- Cranking the yellow crank rotates the telescope in a 180º vertical arc.
- The telescope can be pointed at the starry sky, MoRatch, EM-Start, AL-Star, the Inner Courtyard, the Courtyard Grove, the Upper Courtyard, the Pyramid, the East Tower, and the West Tower. The adventurers can opt to explore all viewpoints or point the telescope at individual areas.
- Starry sky: The telescope is initially focused on a small cluster of stars in the sky to the south west. History DC 15 check to identify the star cluster as the Six Sided Sisters.
- MoRatch: As you focus on the city of MoRatch you can see the sleepy goings-ons of the city folk as they prepare for the night. Brightly illuminated taverns and smoke from warm fireplaces remind you of the hospitality you left behind and the cold reality you now face here in Storm Spire.
- EM-Star: Tonight EM-Star is a silver-blue sliver in the sky, yet that small sliver adds a significant amount of ambient light available to you on your adventure.
- AL-Star: The second red-orange moon is full but much dimmer than its sister. AL-Star has risen above the mountainous horizon and sits partially obscured by mist and clouds.
- Inner Courtyard: The castle’s Inner Courtyard is accessed via two massive curved stairwells. At the top the stairs open into a large balcony, which is connected to a large oval pool that an be crossed by an arching bridge. Inside the courtyard a wide stairway in front of the bridge leads to a small Courtyard Grove, surrounded by a perimeter wall. On the east side of the courtyard is some sort of statue in front of a cliff face, and on the west a crumbling stairway wraps around a huge oak tree along the west perimeter wall to the Upper Courtyard.
- Courtyard Grove: A small grove of oak trees connects the Inner Courtyard to the Upper Courtyard. For a second you think you see something moving within the trees, but then it’s gone. You decide it must have just been a trick of the darkness.
- Upper Courtyard: Past the Courtyard Grove four fountains sit in front of a triangular staircase, leading up to a majestic limestone Pyramid.
- Pyramid: A large limestone equiangular pyramid sits in the middle of the castle, north of the Upper Courtyard. The sides of the pyramid are made from massive bricks, and appear smooth with only small gaps where the slanted stones join every 20 feet. The top of the pyramid looks to be made of crystal and strangely, seems to be absorbing the faint moonlight instead of reflecting it.
- East Tower: To the north east of the Pyramid behind the keep’s east wing is a sturdy blue tower that rises well above the Pyramid’s peak. The top of the tower is a strange icosahedron glass dome structure (the dome is a glass 20-sider). Inside, large mechanical instruments can barely be seen in the moonlight.
- West Tower: To the south west of the Pyramid is a sturdy orange tower, rising above the pyramid but not as tall as the East Tower. The top of the tower is formed by an odd dodecahedron glass structure (the spire is a glass 12-sider). Inside, large mechanical instruments can barely be seen in the moonlight.
Courtyard Orchard
Encounter
- If the adventurers attempt to cross the pond in the rowboat or otherwise, three water elementals manifest 20 feet apart from each other. The one in the middle says, "Speak the password only, then you may enter the sacred orchard." If the adventurers do not speak the password, or say anything else, the elementals attack. The password is "Storm Spire" or "Mount Solace", and the riddle can be found carved into the boat (see West Courtyard).
- Water Elemental (3), MM 125, Medium Difficulty (CR 13)
- HP: 113, 108, 99
- Tactics: The elementals will attempt to grapple and drown the adventurers, knock adventurers out of the boat, dispersing them throughout the water, which requires swimming movement.
Across the flooded pond sits a small photo-luminescent orchard tucked between the outer walls to the west (150 feet high) and the Inner Courtyard walls to the east (100 feet high). As you step into the grove it comes alive with light and color. Hundreds of fireflies buzz and zip around the orchard which starts pulsating vibrantly with glowing fruits, flowers, and mushrooms. Initially the vision is overwhelming, then your eyes start to adjust to the bright light and movement. The orchard is wondrous and unlike anything you have ever seen.
Search
- Lavender, lilac, foxglove (Poisonous Flower: Constitution Save DC 13, -2 to ability checks for 4 hours), jasmine.
- Apples, pears, pomegranates (Pomegranate of Life: magical, heals 1d4 + 1 HP), nectarines (Nectarines of Vitality: magical, +3 to constitution saving throws for 1 hour), starfruit, demon persimmon, dragon fruit.
- Blue mushrooms (Poisonous Mushrooms: Constitution Save DC 15, magical, 4d6 damage initially, 3d6 damage after 1 hour, 2d6 damage after 2 hours), purple mushrooms: (Poisonous: Constitution Save DC 20, magical, hallucinations for 3 hours, -5 to Perception checks).
- Investigation DC 10 or Passive Wisdom check to find a secret doorway (West Tunnel).
Connections
- West: Secret Door. Investigation DC 10 to reveal a tunnel entrance leading into the darkness of the West Tunnel.
- South: West Courtyard.
West Tunnel
- Hidden by a Secret Door, Investigation DC 10 to discover.
- The tunnel must be illuminated to continue unless the adventurers have darkvision.
Behind some bushes you find a secret arched entrance with stairs leading down into the darkness. The stairs count about 50 and at the bottom is a long dark stone passageway.
Search
- Torches (10), tinderbox.
Connections
- East: Courtyard Orchard
- North / South: Secret Door. Investigation DC 12 or a successful Passive Wisdom check reveals a hidden stone doorway (stuck, Strength DC 10 to open) leading north to the Hedge Maze and the Gardens.
- West: Mount Solace, outer wall.
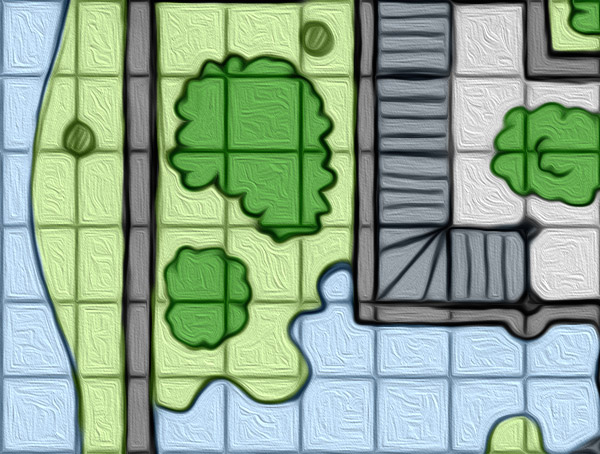
Courtyard Grove
You ascend a set of stone steps, elaborately carved with leaves and vines. As you step onto level ground your boots are met with a soft mossy forest floor. The oak trees appear well manicured. A thick mist clings to the ground while smaller wisps of mist swirl through the tree branches.
Encounter
- As the adventurers move into the forest each rolls a Perception DC 18 check. On failure they become entangled in Giant Spider webs, and are surprised by 12 Giant Spiders from all sides.
- Giant Spider (12), MM 328, Easy Difficulty (CR 11)
- HP: 26, 24, 18, 29, 25, 37, 35, 24, 26, 25, 28, 30
- Tactics: The spiders will attempt to entangle the adventurers in webs from trees which provide partial cover and keep them out of reach of melee attacks.
Search
- Small humanoid wrapped in web, medium humanoid wrapped in a web, Small Wood Key.
- Small humanoid: 15 gold, dagger, leather armor, clear potion (Superior Healing, DMG 187).
- Medium humanoid: 8 gold, short sword, studded leather armor, rope (50 feet), pulsating red potion (Potion of Vitality, DMG 188).
Connections
- North: Upper Courtyard.
- South: Inner Courtyard.
On the north side of the grove a small staircase, also elaborately carved with leaves and vines, rises out of the foliage to the Upper Courtyard.
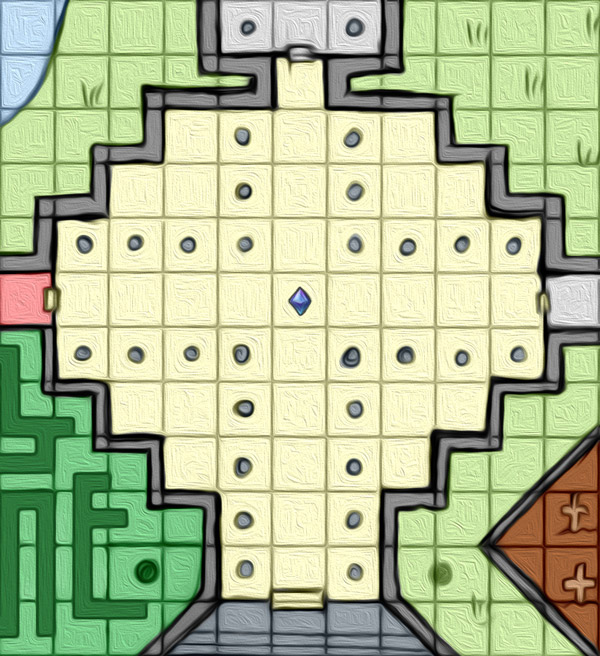
Upper Courtyard
You step into the Upper Courtyard and are in awe of its breathtaking craftsmanship and beauty. The courtyard is made entirely of smooth marble. The marble reflects and amplifies the moonlight, illuminating the entire courtyard, allowing you to observe it in entirety regardless of the twilight.
Four large circular fountains, 30 feet in diameter, fill the center of the courtyard in a neat row, spaced 30 feet apart. They smell of brimstone and softly bubble.
Stone columns sit on either side of the array of fountains near the walls. A 270 foot wide staircase sits behind the fountains and narrows as it rises a steep 75 feet to meet a massive 30 foot wide limestone doorway. The doorway is inset into the slanted wall of an awesome limestone equiangular pyramid.
To the east is a sizable wooden doorway built into the courtyard’s inner walls (to Living Quarters). To the west is a smaller stone doorway made from what appears to be jade (to Hot Springs).
Condition: If the water wheel is running.
- You can hear the sound of running water all around you. The fountains, which must be fed by an advanced underground plumbing system, are flowing strongly. The plumbing system must be ancient but it appears to have been running perfectly without maintenance for decades.
Condition: If the water wheel has been stopped or destroyed.
- The fountains are not running and each pool of water sits still and silent in the night.
Search
- A pouch of strange dust (Dust of Disappearance, DMG 166), battle axe (Magic Weapon +2), herbalism kit, magnifying glass, bottle of fine wine, pick-nick blanket.
- A Large Blue Steel Cog sits on the ground next to the second fountain from the left.
Connections
- North: Limestone doorway to the Pyramid, barred from the inside, Strength DC 30 to force open.
- East: Wooden doorway to the Living Quarters, openable with the Small Wood Key, Strength DC 15 to force open, or Dexterity DC 15 to pick using Thieve’s Tools.
- West: Jade doorway to the Hot Springs
- South: Courtyard Grove. Crumbling stairs to the Inner Courtyard. Attempting to descend the crumbling stairway (if they have not already fallen) causes it to crumble underfoot. Acrobatics DC 15 check to leap to the edge of the staircase as it falls away. Anyone failing the check takes 4d6 falling damage.
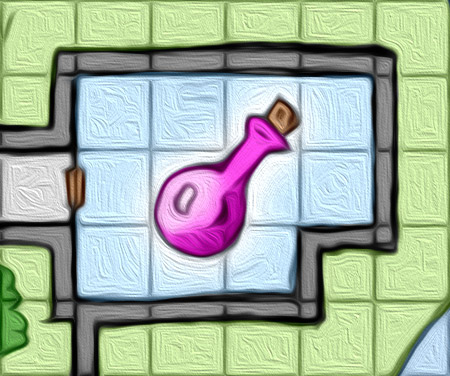
Hot Springs
The jade doorway swings open easily, revealing a large waiting room. Benches and tables have been neatly arranged and several aromatic vials are scattered around. On the west end of the room is a second almost identical jade doorway, which is slightly cracked. You can see steam billowing out.
Search (Waiting Room)
- Oil of lavender (3), oil of peppermint (4), tea tree oil (6), oil of grapefruit (2), oil of rosemary (5, magic, +2 to all Constitution saving throws for 2 hours), oil of eucalyptus (5, magic, +2 to all Intelligence ability checks for 2 hours).
You push open the second jade doorway and are met by a wave of moisture and heat as the steam from the next room envelopes you. As your eyes adjust to the thick steamy fog, you can see several torches illuminating the large 60 foot by 120 foot room. The room contains pools and baths, bubbling with the heat from a natural hot spring which the spa has been built on top of.
A dwarf (Eraket) sits in one of the larger baths, humming loudly, and munching on a meal of bread, cheese, and meat, gulping in-between bites from a large bucket of wine. “Welcome! Welcome to the finest... and only... bathhouse atop Mount Solace! You, my fine adventuring friends, look like you could use a nice long soak. Care for any refreshments?”
Search
- Broken plumbing, old towels (4), pitcher (3), ceramic cups (8), soap (3), oil of lavender (2), oil of peppermint, tea tree oil (2), oil of grapefruit, metal bracers (Bracers of Defense, DMG 156).
Actions
- Talk with Eraket.
- Eraket comes to the Hot Springs often, sneaking in through the secret West Tunnel. His sister, Brooke, sometimes comes to use the Smithy on the west side of the castle.
- Persuasion DC 15 or Intimidation DC 15 to get answers to questions about Mount Solace, Storm Spire, the Storm Crows, Haze Bringer, specific monsters, the pyramid puzzle, etc. There is a 75% chance that Eraket knows the answer.
- Baths: The hot springs filling the baths have powerful magic healing properties. Resting while inside the baths requires a quarter of the standard resting time. Spending 15 minutes in the baths is equal to a short rest. Additionally for every 15 minutes spent in the baths the adventurers are healed 1d6 + 1 hit points.
Connections
- East: Upper Courtyard.
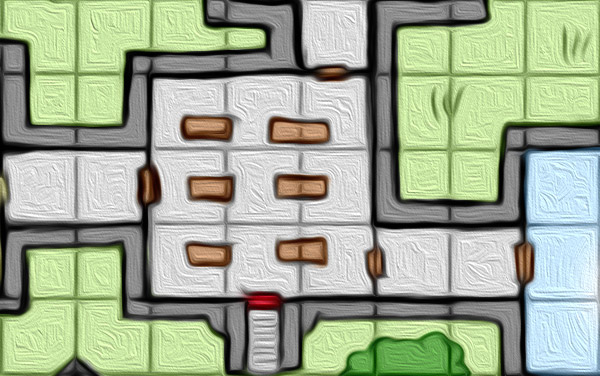
Living Quarters
- Blocked: Locked, wooden door, openable with the Small Wood Key, Strength DC 15 to force open, or Dexterity DC 15 to pick using Thieve’s Tools.
- Adventurers cannot proceed through the flooded room if the water wheel is running.
- Dark: Adventurers will need to illuminate the hallway or have darkvision to proceed.
- Flooded: Difficult terrain, movement reduced to half speed.
You enter the Living Quarters from the west and are presented with a short flight of steps leading down to a large stone hallway. The room is 30 feet wide with huge vaulted ceilings that rise 90 feet above you. The hall features skylights and windows but scarce moonlight from outside makes its way inside. You feel as though you are being watched.
Condition: If the water wheel is running.
- The first thing you notice is the sound of rushing water. The hallway is completely flooded. Moldy tapestries line the walls. About 3 feet of water sits at the bottom of the steps. The hallway appears to have been flooded for quite some time. Slimy plants and lily pads can be seen on the surface of the water, which has a black oily film on top. About 40 feet from the entrance you can see multiple large broken pipes amongst rubble and debris. Several pipes coming from the floors and the south wall are spewing water under extreme pressure.
- The wall of water appears impassable, grinding down on the stone hallway with a force that would throw a person violently against the wall. The excess water is draining out through the deteriorating stonework. From a window on the south wall you can see into the East Courtyard where a massive water wheel is slowly turning in the night. Several large pipes run from the water wheel’s pump house into the keep.
Condition: If the water wheel has been stopped or destroyed.
- The hallway is completely flooded with moldy tapestries lining the walls. About 3 feet of water sits at the bottom of the steps leading to a 200 foot long hall. There are several large broken pipes draining into the flooded walkway. Several (6) petrified figures decorate the long hallway, their actions encased in stone for eternity. A series of 4 doorways on the north wall, and a single doorway at the end of the long hall to the east appear to grant passage out of this grim scene.
- Huge tentacle appendages burst forth from the water and snake out of cracks in the walls. You frantically look around trying to to orient yourself to the source of the surge. At the far end of the long hall floating 60 feet above you in the air you see a single huge eye gleaming in the moonlight with smaller gleaming eyes snaking around it. You’ve stumbled into a Beholder’s lair!
Encounter
- As the adventurers move down the hall each rolls a Perception DC 20 check. On failure they are surprised by the Beholder lair’s grasping appendages.
- Beholder (lair), MM 26, Medium Difficulty (CR 14)
- HP: 166
- Tactics: The beholder levitates 60 feet above the water, using its antimagic cone to disable magic items and spells. It uses its eye rays to attack the adventurers. The layer’s grasping appendages are used to grapple and restrain the adventurers (which take their turn on initiative 20).
The Living Quarters contain a series of flooded rooms. Each features comforts such as beds, desks, dressers, wardrobes, clothing, plates, utensils, and other personal items.
Search
- Common household items, dagger (3), hatchet (4), short sword, elegant cloak (Cloak of Displacement, DMG 158), jar of jam, woodcarver’s tools, iron holy symbol, vial of ink, dragonchess set, soap, wash basin, locked stone chest (contains 55 GP), Old Bronze Key (opens Kitchen), 22 gold pieces, 32 silver pieces.
- Beholder Lair: bottle stopper cork embossed with gold leaf and set with amethysts (2), ceremonial electrum dagger with black pearl in the pommel, small gold idol, large chest with about 512 gold pieces, chest with 223 platinum pieces, bottle containing transparent liquid (Potion of Frost Giant Strength, DMG 187), red liquid potion (Potion of Diminution, DMG 187), jar containing a metallic liquid (Potion of Invulnerability, DMG 188), pair of smooth stones with matching glyphs (Sending Stones, DMG 199, Sending, PHB 274).
Connections
- North: Wooden doorway to the Barracks.
- East: Wooden doorway to the Smithy.
- West: Wooden doorway to the Upper Courtyard.
Smithy
From outside the door you can hear loud clanking and banging and smoke can be seen leaking under the door and through the cracks.
You push open the wooden door and are bombarded with noise and billowing smoke. “Hey there, hmm? Welcome to my shop!” a dwarf (Brooke) calls out to you as you see her appear through the smoke, “Let’s get some windows open so we can breathe, hmm?” She disappears back into the thick smoke. A moment later wind rushes into the room, thinning the smoke and allowing you to observe the room.
You look around to find yourself in a large smithy. The room is 120 feet long and 90 feet deep. Five separate forges and billows are scattered around the room amongst anvils, fireplaces, work benches, and tool racks. The smithy is in excellent condition and you guess this dwarf is the one responsible for its upkeep.
Notes
- Brooke does not take kindly to the adventurers messing with or taking things from the Smithy without permission.
Search
- All manner of tools and contraptions, metal ingots (rare and common), scrap metal, firewood, coal, matches, barrel of oil, pieces of armor, pieces of weapons, Red Dragon Scale Armor (DMG 165), elaborate greatsword (magic, +3), quality arrows (30, magic, +2), quality crossbow bolts (30, magic, +2).
Actions
- Persuasion DC 10 or Intimidation DC 20 to convince Brooke to fix any broken metal weapon, armor, or equipment, including magical items.
- Persuasion DC 10 or Intimidation DC 20 to get information about Mount Solace, Storm Spire, the Storm Crows, Haze Bringer, specific monsters, the pyramid puzzle, etc. There is a 75% chance that Brooke knows the answer.
- Adventurers proficient in smith’s tools can use the forges and equipment to smith with no resistance from Brooke.
Connections
- West: Wooden doorway to the Living Quarters.
Barracks
You step into a large barracks that doubles as an armory. The room is 150 long and 90 feet wide. The ceilings are vaulted 90 feet and three mezzanine levels encircle the open lower level where you see weapon racks, armor racks, combat rings, practice dummies, and archery ranges. Through a huge glass ceiling the room is completely illuminated by the light of the moon AL-Star which is now directly above.
The upper mezzanine levels have open rooms containing desks and cabinets, numerous small bunks for soldiers, privies, wash rooms, kitchens, and mess areas.
Over 100 soldiers could comfortably live and train in such a place. Today, however, the room sits in ruin. Knocked over weapon racks and tables are everywhere; broken weapons and armor litter the room. Old food and stale drinks can be smelled on the floor. The Barracks looks like a significant number of nasty goblins, knolls, ogre, or other foul creatures have inhabited the space for a significant amount of time.
There is a locked metal door to the north and wooden doors to the south and west.
Search
- Chainmail armor, shield (2), boots (2), longsword (5), dragon-hilted short sword (Dragon Slayer, DMG 166), battle axe (5), ornate spear (magic, +2), lance, longbow (3), arrows (50), bolts (43), 55 gold pieces, 124 silver pieces, old food, books, parchment, pen & ink, clothing, flatware, utensils, cups, cooking pots, cauldron, barrel of stale beer, bucket of oil, rope, dice set, crowbar, canvas (50 feet).
Connections
- North: Metal doorway to Kitchen. Locked, openable with the Old Bronze Key, Strength DC 15 to force open, or Dexterity DC 15 to pick using Thieve’s Tools
- South: Wooden doorway to Living Quarters. Locked, openable with the Small Wood Key, Strength DC 15 to force open.
- West: Wooden doorway to Gardens.
Kitchen
The rich smell of fresh baked bread and meat slams your senses with an abrupt but pleasant sensation. Confused, you think maybe someone has been cooking? You stand in an elaborate large-scale industrial kitchen. A trained team could cook enough food here to feed an army, let alone the inhabitants of Storm Spire.
Pantries and storerooms line the walls while the center of this large room features a series of twelve brick ovens, advanced gas stovetops, fire places, and cauldrons. Plumbing and water spigots are scattered around the kitchen over large wooden basins. The kitchen has seen better days, but appears to still be functioning. There is a smoldering fire in one of the ovens. Someone’s definitely been cooking. The rich smells trigger your hunger and you realize you are famished.
Search
- Pots, pans, utensils, flatware, knives, ladles, cups, grain, wheat, tea, dried meat, dried fruit, spices, cooking oils, machine oil, red potion (Potion of Greater Healing, DMG 187), foggy potion (Potion of Gaseous Form, DMG 187).
Actions
- Adventurers can prepare a nice home-cooked meal.
Connections
- North: Metal doorway to the Gardens.
- South: Metal doorway to the Barracks.
Gardens
Fresh air greets you as a light breeze tosses a low fog around your legs. This large open area looks as though it was once a bountiful garden courtyard. It has seen better days however. Weeds and dead plants are scattered about. Rotting trees from an old orchard can be seen crumbling while mushrooms and other fungus reclaim the area. Vines cling to the perimeter walls and buildings.
Here you can see the Barracks and Kitchen to the south east and the Pyramid to the north west. You can see a long staircase leading to a red stone doorway connecting the Gardens to the castle’s east wing. A small grove of trees can be seen in the north east corner. Through the mist you can see a tall iron fence within the garden walls, topped with mean looking spikes, and a barred gate.
Search
- Shovel, pry bar, bag of seeds, net, 12 gold pieces, flask (containing aged whisky), canning jar with orange liquid (Potion of Speed, DMG 188).
- Orange Copper Key (opens the West Tower) under a small planter pot.
Connections
- Graveyard: Barred, Strength DC 12 to force open.
- North: Red stone doorway to the Dining Hall. Locked, openable with the Red Stone Key, Strength DC 20 to force open, or Dexterity DC 20 to pick using Thieve’s Tools.
- East: Wooden doorway to the Barracks.
- East: Metal doorway to the Kitchen. Locked, openable with the Old Bronze Key, Strength DC 15 to force open, or Dexterity DC 15 to pick using Thieve’s Tools.
- West: Investigation DC 12 or Passive Wisdom check reveals a secret tunnel to the Hedge Maze.
Graveyard
You bust open the hefty iron gate to the Graveyard and step inside. The ground is soft and damp. Mist swirls around a broken headstone with a single dried red rose set upon it. In the distance you can see crypts surrounded by old wooden crosses, hammered into the soil. Graves can be seen everywhere. A rat scurries past you and burrows into a large pile of bones. You don’t like the look of this place but maybe something useful will turn up?
Search
- Bones, skulls, flowers, Red Stone Key (to the Dining Hall), glowing blue sapphire (Air Elemental Gem, DMG 167).
Connections
- Gardens.
Condition: If the Red Stone Key is touched.
- Upon touching the Red Stone Key the ground starts to shake. Dirt shifts and insects scurry across the ground. A mound of dirt rises and a thin skeletal hand erupts from the ground grabbing the adventurer that touched the key. The player must make a Dexterity DC 15 saving throw to avoid being grappled. You see the top of a skull press through the earth, then another hand; they are everywhere! At least a hundred skeletons are rising from their graves and crawling from the crypts all around you!
Encounter
- Skeletons rise from their graves surrounding the adventurers while several minotaur skeletons emerge from crypts.
- Skeletons (100), MM 272; Minotaur Skeletons (10), MM 273, Hard Difficulty (CR 17)
- HP: Skeletons: 13 each; Minotaur Skeletons: 67 each
- Tactics: Skeletons swarm the adventurers, running is the player’s best option.
Dining Hall
You push the hefty red stone doorway open to reveal a large square dining hall. The room’s vaulted clings feature elaborate crystal chandeliers carved in the shape of dragons. There are 6 tables, each 20 feet long and 6 feet wide in two orderly rows. Large banquets were held here long ago but today the only thing feasting is 8 stubborn looking ogres, who are being waited upon by a single scrawny looking kobold (Tangor). The ogres look up from their meal of fresh baked bread and steaming rare meat and growl. You have obviously disrupted their supper.
The largest ogre gets up, dragging a large spiked club, chuckles in deep booming notes, and says, “Looks like Tangor is going to have more to cook.”
Condition: If the crystal top has been activated by EM-Star’s light (East Tower).
- The crystal chandeliers glow brightly with blue light, completely illuminating the room.
Encounter
- 9 Ogres, disrupted from their supper, and ready to smash things, turn and attack.
- Ogre (8) (MM 237), Grog (Ogre Leader) (MM 237), Medium Difficulty (CR 17)
- HP: 66, 64, 55, 51, 59, 55, 72, 63; Grog: 110
- Grog: AC 18 (Half Plate), Spiked Club (Melee, +8 to hit, 2d8 + 5 bludgeoning damage)
Search
- Plates, bowls, spoons, knives, fine goblets, bottle of wine (4), bottle of rum.
- 4 gems (worth 50 GP), 15 gems (worth 10 GP), crystal lenses (Eyes of minute seeing, DMG 168), pearl (Pearl of power, DMG 184), gauntlets (Gauntlets of ogre power, DMG 184), potion containing a large fingernail (Potion of stone giant strength, DMG 187), purple potion (Potion of mind reading, DMG 188).
Actions
- Talk with Tangor:
- Tangor is a shy, mumbling Kobold that can be persuaded to help for a short duration on a successful Persuasion DC 15 check or Intimidation DC 10 check.
- He has information about the ogres, Mount Solace, Storm Spire, the Storm Crows, Haze Bringer, specific monsters, the pyramid puzzle, etc.
Connections
- North: Wooden doorway to the East Tower. Locked, openable with the Blue Steel Key, Strength DC 18 to force open, or Dexterity DC 18 to pick using Thieve’s Tools.
- East: Wooden doorway to the Laboratory. Locked and protected by a force field, openable only with the Purple Steel Key.
- South: Red stone doorway to the Gardens.
- West: Wooden doorway to the Pyramid.
Laboratory
Flashing blue, pink, and green lights accompanied by strange popping and wizzing sounds emanate from the cracks around an old wooden door. A purple electric force field flickers in front of the door with a small opening around a keyhole. (Adventurers must have the Purple Steel Key to proceed.)
Using the Purple Steel Key you unlock the door which snaps to the left with a satisfying click. The force field dissolves and you slowly push the wooden door open. The room is full of a glowing purple haze that makes you stutter and cough, the noise of the lock is concealed by a loud buzzing. Through the haze you make out what is an impressively stocked laboratory. Shelves line the walls with books, potions, ingredients, and wondrous items of all manners. A wide workbench runs along the east end of the room in front of floor to ceiling windows, overlooking a starlit mountain range. Decanters, alembics, aludels, and retorts bubble and crackle over bunsen burners.
At the workbench sits a bony man in a red robe, his back turned to you (Ravendor). He is mumbling to himself and appears deep in concentration. You don’t think he even knows you are here.
Actions
- The adventurers can silently try to steal potions and magical items from the room. Randomly roll a d20 for one of the items in the Search section below, Stealth DC 15 to successfully take an item unseen, a failed Stealth DC 10 check causes Ravendor to detect the adventurers and confront them as thieves.
- Talk to Ravendor: “I am the great Archmage Ravendor! What are you doing in my Laboratory?”
- Persuasion DC 15 or Deception DC 15 to convince Ravendor to give up information about Mount Solace, Storm Spire, the Storm Crows, Haze Bringer, specific monsters, the pyramid puzzle, etc.
- Ravendor is in collaboration with the dragon Haze Bringer, twisting dark magic and alchemy in exchange for riches and power. He helps Haze Bringer control the darkness permeating Storm Spire. This laboratory is the realm’s most advanced research facility. He lives comfortably in the Royal Chambers.
- Ravendor isn’t too concerned with the adventurers being here, as he doesn’t believe they pose any threat to him or Haze Bringer. If told of their objective he just laughs, “Haze Bringer will make quick work of you, if something else doesn’t get you first.”
- Persuasion DC 20 to convince Ravendor to give up a magical item or potion.
- Ravendor is immune to Intimidation.
- Fight Ravendor.
Encounter
- Archmage Ravendor is quite displeased with the interruption and may decide to dispatch the annoying adventurers with utmost haste, however he is rather busy and may just send them on their way if not provoked.
- Archmage, MM 342 (with modified spells, see bellow), Medium Difficulty (CR 17)
- HP: 106
- AC: 16 (Mage Armor, Ring of Protection)
- Spells: Level 9: Time Stop; Level 8: Maze; Level 7: Finger of Death (if Ravendor is killed, a changed player is reverted to their original form); Level 6: Chain Lightning; Level 5: Dominate Person, Hold Monster, Conjure Elemental; Level 4: Fire Shield, Hallucinatory Terrain, Ice Storm; Level 3: Counterspell, Haste, Lightning Bolt; Level 2: Mirror Image, Darkness, Hold Person; Level 1: Magic Missile, Mage Armor (always active), Shield; Cantrips: Fire Bolt.
- Tactics: Ravendor casts Time Stop immediately, then as turns allow casts Haste, conjures a Fire Elemental, casts Hallucinatory Terrain, and finally casts Fire Shield.
Search
- Potions (starting at DMG 187): Bottle containing a large fingernail (Potion of Stone Giant Strength), amber (Potion of Longevity), yellow (Potion of Speed), red (Potion of Healing), brown and silver (Potion of Climbing), orange (Potion of Fire Resistance), fog (Potion of Gaseous Form).
- Rings (starting at DMG 189): Jade (Ring of Regeneration), wood (Ring of Jumping), iron (Ring of Protection), ivory (Ring of the Ram), garnet (Ring of Fire Resistance).
- Oils (starting at DMG 183): Oil (Oil of Sharpness), oil (Oil of Slipperiness).
- Glue (Sovereign Glue, DMG 200), wand (Wand of wonder, DMG 212), globe (Driftglobe, DMG 166), cloak (Cloak of the Manta Ray, DMG 159), belt (Belt of Frost Giant Strength, DMG 155), staff (Staff of healing, DMG 202).
- Barrel of oil, herbalism kit, healer's kit, small tools, alchemical equipment, rope, sewing kit, fabric, snacks.
Connections
- West: Wooden doorway to the Dining Hall.
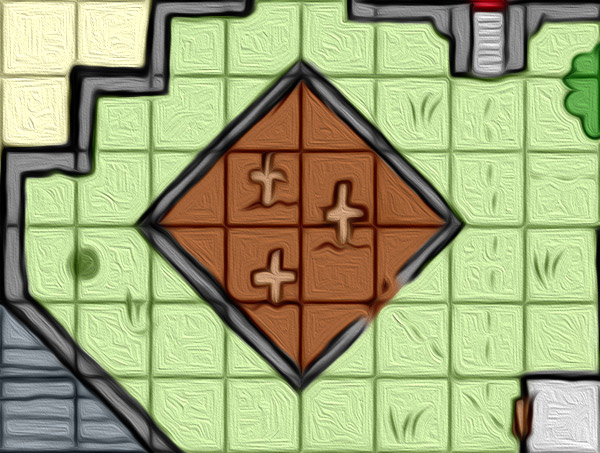
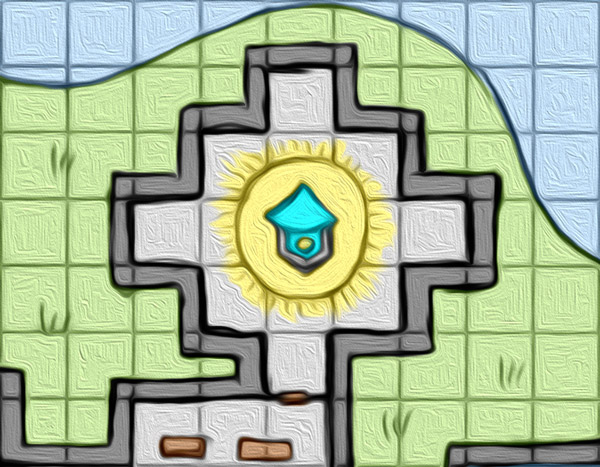
Pyramid
You are in awe as you enter the Pyramid. The Pyramid has been immaculately constructed from huge limestone blocks. The inside walls are smooth, angling up to meet around a clear crystal top. Faint starlight twinkles through the crystal casting an eerie dark feeling throughout the interior. Huge pillars from floor to ceiling create isles running north to south and east to west.
Down the center of the isles are crystal lines, a few inches wide, embossed into the limestone. On the east and south the crystals are a faint blue, and on the north and west the crystals are a dull orange. In the center of the Pyramid the crystal lines meet at a large irregular crystal, about 4 feet tall and two feet wide, with several small crystals jutting out around the base. Smaller crystals are placed on the walls every 30 feet 10 feet from the ground.
To the north sits a large iron statue of an armor clad warrior, kneeling with his head bowed, arms extended offering a sword. To the south is a massive 30 foot wide limestone doorway, barred from the inside. To the east and west are smaller limestone doorways leading to the keep’s wings.
Condition: Once the crystal top has been activated by moonlight from both moons.
- A pulsating beam of (blue and/or orange) electricity extends from the crystal ceiling of the pyramid to the crystal on the floor. A dim hum of electricity fills the room. The crystal lines running along the floor are now glowing with energy. The crystals along the walls are pulsating with light, fully illuminating the pyramid’s interior, casting awe-inspiring shadows against the pillars in every direction.
- A massive Iron Golem patrols the room, shaking the ground with each step!
- If an adventurer touches the moon activated crystal, they can draw power from it. Roll a d100.
- 1-25: The adventurer is healed 3d10 hit points.
- 26-50: The adventurer regains one spell slot or ability of their choice.
- 51-75: The adventurer gains 4d4 temporary hit points.
- 76-100: The adventurer gains advantage on all saving throws for 2d6 rounds.
Encounter
- Once the crystal top has been activated by both moons, the Iron Golem is roaming around the pyramid.
- Iron Golem, MM 170, Hard Difficulty (CR 16)
- HP: 230
- Tactics: The Iron Golem will attack any intruders on sight. When the Iron Golem is reduced to half HP or less, it will retreat to the crystal in the center of the room and recharge 4d10 hit points while in contact with it.
Search
- Large Orange Copper Cog sits beside the crystal in the center of the room.
Actions
- The adventurers can unbar the massive doorway to the south on a Strength DC 12 check, unblocking it.
Connections
- North: Secret Door to the Throne Room. Revealed from behind the Iron Golem once the crystal is activated by both moons.
- East: Limestone doorway to the Dining Hall. Locked, openable with the Red Stone Key, Strength DC 20 to force open, or Dexterity DC 20 to pick using Thieve’s Tools.
- South: Limestone doorway to the Upper Courtyard. Bar must be lifted to open, Strength DC 12.
- West: Limestone doorway to the Library.
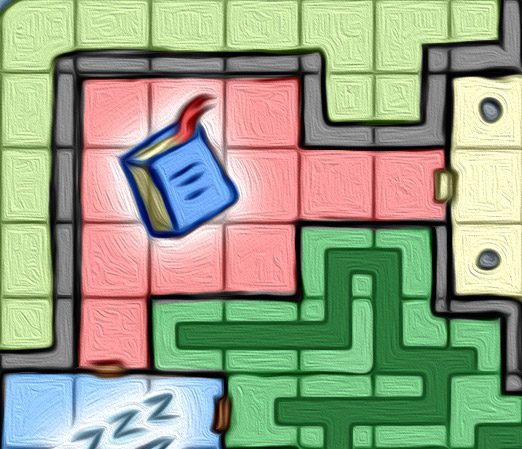
Library
At the end of a 60 foot hallway, elaborately tiled with a mosaic of dragons in battle, you find yourself standing at the entrance of a once fantastical library. A 30 foot curved wooden archway connects the hall to the library. Books cover the walls with rolling ladders 20 feet high. Large bookcases segment the 90 by 90 foot room into smaller sections, intricately finished with expensive black-oak wood, now marred with scratches and burn marks.
It looks as though battles have been fought in this library, mainly punctuated by the piles of bones scattered about. The floor is made of large stone tiles with old carpets covering large areas. Tables and desks are overturned onto the floor and books have been scattered everywhere. Stacks of books up to ten feet high create awkward pillars throughout the space. Like the Pyramid, crystals line the walls at 30 foot intervals, 10 feet from the ground.
A few books are floating in front of you. Which seems... odd.
Condition: Once the crystal top has been activated by AL-Star’s light (West Tower).
- The crystals in the Library now glow with a faint orange light.
Encounter
- The floating books are inside 6 Gelatinous Cubes. Moving towards the books without a successful Perception DC 15 check causes the adventurers to be surprised and engulfed in a cube before initiative.
- Gelatinous Cube, MM 242, Easy Difficulty (CR 9)
- HP: 92, 86, 74, 74, 88, 75
- Tactics: The cubes cannot easily be detected and wait for adventurers to wander into them.
Search
- Bone Key hidden inside a cutout in a book near the Royal Chambers.
- Books of all shapes, sizes, and rarity.
- Small Blue Steel Cog wrapped inside soiled rags.
- Chess set, hourglass, broken mechanical watch, parchment, quill pens, inkwells, broken planter pots, headband (Headband of Intellect, DMG 173).
Actions
- The adventurers can search the Library for information. History DC 15 to find the answer to any question relating to Mount Solace, Storm Spire, the Storm Crows, Haze Bringer, specific monsters, the pyramid puzzle, etc.
Connections
- East: Limestone doorway to the Pyramid.
- South: Wooden doorway to the Royal Chambers. Locked, openable with the Bone Key, Strength DC 12 to force open, or Dexterity DC 12 to pick using Thieve’s Tools.
Royal Chambers
South from the Library connects to the Royal Chambers. Wow! You’ve never seen such a series of elegant bedrooms in your life. Unlike the library before it, this space has seen little damage. It even appears that someone may still inhabit the space (Ravendor). In the largest room the bedsheets have been thrown aside on a massive royal four-post bed. Several bookshelves with choice picks of rare books from the Library line the walls. A large fireplace stands against the west wall, still glowing with embers. Firewood is stacked beside it and you think about how nice it would be to warm yourself next to a fire.
An elegant suit of full plate armor is set up on a stand in the north east corner of the room. A large window on the east wall overlooks what appears to be an intricate hedge garden. Through a large skylight in the ceiling you can see a tall orange tower just to the south of the room.
Search
- Fine robes and royal garments, a shield with the Storm Crow insignia, a small chest (locked, contains 30 GP, 2 rubies, and an emerald), a dagger (Magic Weapon +1), red potion (Potion of Superior Healing, DMG 187), crimson potion (Potion of Vitality, DMG 188), quill pen, ink, parchment, paperweight, merchant’s scale, small silver ring (Ring of Regeneration, DMG 191).
Actions
- The adventurers can build a fire to warm themselves.
Connections
- North: Wooden door to the Library.
- East: Wooden door to the Hedge Maze.
- South: Wooden door to the West Tower.
Hedge Maze
You step into a maze formed by 12 foot tall thick hedges. Everything from the knee down is obscured by a thick mist that swirls around you. The maze starts with forked parallel passages running east. On the right you can see a ninety degree right turn just 30 feet ahead. On the left the hedges lead straight into the mist.
Encounter
- After several turns of the maze, or if the adventurers try to pierce the hedges, have each roll a Perception DC 18 check. On success they detect 3 Shambling Mounds lurking within the hedge maze’s walls. The mounds surprise attack the adventurers that fail their Perception check and attempt to engulf them.
- Shambling Mound (3), MM 270, Medium Difficulty (CR 13)
- HP: 140, 132, 138
- Tactics: The mounds wait for adventurers to wander near them and then try to surprise the adventurers.
Search
- Blue Steel Key (opens the East Tower) on the ground under some weeds.
- Decaying skull, rotting gopher, old shoes, bedroll, sledge hammer, shovel, incandescent blue sphere (Ioun Stone, Insight, DMG 177), dusty rose prism (Ioun Stone, Protection, DMG 177).
Connections
- East: Secret Door. Investigation DC 15, reveals a secret tunnel entrance connecting to the Gardens behind the Graveyard.
- South: Secret Door. Investigation DC 12, reveals a secret tunnel entrance connecting to the West Tunnel.
- West: Wooden doorway to the Royal Chambers.
East Tower
- Locked by two doors both openable with the Blue Steel Key, Strength DC 18 to force each open, or Dexterity DC 18 to pick each using Thieve’s Tools.
- Both the Small Blue Steel Cog and the Large Blue Steel Cog must be placed and oiled to make the tower operable again, allowing the adventurers to orient the reflective mirror at the Pyramid’s crystal top.
- Insight DC 12 to identify that the cogs must be oiled before they can be turned.
- Insight DC 15 to identify that the mirror must be pointed at the top of the Pyramid.
Spiraling stairs around a central stone core lead up into the large East Tower. At the top is a thick oak doorway (locked, also openable with the Blue Steel Key, Strength DC 18 to open, or Dexterity DC 18 to pick each using Thieve’s Tools).
Inside the tower’s strange hexagonal glass spire you find an intricate mechanical array that controls the position of a large mirror. The room is a dome made of 6 foot glass triangular windows on all sides which forms an icosahedron (the dome is a glass 20-sider). The starry sky can clearly be observed through the glass room and the two moons glow brightly in the sky. Below you see the Pyramid to the south west. The east wing and the Garden courtyard can be seen to the south.
Two large cranks are mounted on the floor connected to the mechanical array (rotating them does nothing until the cogs have been replaced and oiled).
An engraved plaque on the floor is written in Dwarven (requires speaking Dwarven to read).
Condition: If the plaque is read.
Constructed by Mortimer, Dwarven Mechanical Master Artisan. For Queen Niah Storm Crow. May the light of EM-Star forever shine brightly upon your kingdom.
Search
- The mechanical array appears to be missing a small and a large cog.
- Chisel, rags, small fireplace, firewood, hand pumped oiler (empty, oil will need to be provided), hooded lantern (empty), wire, marbles.
Actions
- Placing the missing Small Blue Steel Cog and Large Blue Steel Cog into the machine will make it complete again.
- The machine won’t operate until it has been oiled.
- Once the cogs have been replaced and the machine has been oiled the cranks can be used to position the mirror to reflect the blue moonlight from EM-Star at the Pyramid’s glass top.
Connections
- South: Wooden doorway to the Dining Hall.
Condition: When the light of EM-Start is reflected onto the Pyramid’s top.
- You reposition the mirror to reflect the light of EM-Star to the crystal top of the Pyramid. The crystal top begins to pulse slowly with bright icy blue light.
Condition: If the West Tower mirror has also been oriented to reflect light onto the Pyramid.
- Below you, deep inside the keep, you can hear a loud clanking begin to emanate through the halls. The sound of mechanical plates scraping against each other, accompanied by a thump... thump... thump... Something massive is moving.
West Tower
- Locked by two doors openable with the Orange Copper Key, Strength DC 18 to force each open, or Dexterity DC 18 to pick each using Thieve’s Tools.
- Both the Small Orange Copper Cog and the Large Orange Copper Cog must be placed and oiled to make the tower operable again, allowing the adventurers to orient the reflective mirror at the Pyramid’s crystal top.
- Insight DC 12 to identify that the cogs must be oiled before they can be turned.
- Insight DC 15 to identify that the mirror must be pointed at the top of the Pyramid.
Spiraling stairs around a central stone core lead up into the large West Tower. At the top is a thick madrone doorway (locked, also openable with the Orange Copper Key, Strength DC 18 to open, or Dexterity DC 18 to pick using Thieve’s Tools).
Inside the tower’s strange dodecahedron glass spire (the spire is a glass 12-sider) you find an intricate mechanical array that controls the position of a large mirror. The spire is made of 12 foot glass pentagonal windows. The starry sky can clearly be observed through the glass room and the two moons glow brightly in the sky. Below you can see the Pyramid to the north east and the Inner Courtyard to the south east.
Two large cranks are mounted on the floor connected to the mechanical array (rotating them does nothing until the cogs have been replaced and oiled).
An engraved plaque on the floor is written in Dwarven (requires speaking Dwarven to read).
Condition: If the plaque is read.
Constructed by Pan-handle, Dwarven Mechanical Master Artisan. For Queen Niah Storm Crow. May the light of AL-Star forever shine brightly upon your kingdom.
Search
- The mechanical array appears to be missing a small and a large cog.
- Screwdriver, hammer, small fireplace, firewood, hand pumped oiler (empty, oil will need to be provided), bottle of wine, moldy cheese.
Actions
- Placing the missing Small Orange Copper Cog and Large Orange Copper Cog into the machine will make it complete again.
- The machine won’t operate until it has been oiled.
- Once the cogs have been replaced and the machine has been oiled the cranks can be used to position the mirror to reflect the orange moonlight from AL-Star at the Pyramid’s glass top.
Connections
- North: Wooden doorway to the Royal Chambers.
Condition: When the light of AL-Start is reflected onto the Pyramid’s top.
- You reposition the mirror to reflect the light of AL-Star to the crystal top of the Pyramid. The crystal top begins to pulse slowly with bright warming orange light.
Condition: If the East Tower mirror has also been oriented to reflect light onto the Pyramid.
- Below you, deep inside the keep, you can hear a loud clanking begin to emanate through the halls. The sound of mechanical plates scraping against each other, accompanied by a thump... thump... thump... Something massive is moving.
Throne Room
You smell sulfur and pumice as you pull open the limestone doors at the north end of the Pyramid, revealing a magnificent Throne Room illuminated by pulsating crystals similar to the ones in the Pyramid. The room is a 60 by 60 foot cube with a raised throne pedestal at the back. Marble pillars line each side of the Throne Room and an elaborate red and white patterned rug runs from the entrance to the throne. Treasure has been hoarded here. A sea of gold, silver, platinum, gems, rare art pieces, and ornate chests fill the room. The ceiling has been busted open to make easy access for large serpentine creatures.
Haze Bringer, a mighty red dragon, lies wrapped around the throne, half buried in riches. He raises his head and opens two sleepy eyes. Smoke rises from his nostrils.
“What do you want? I’m sleeping,” he asks in a deep scratchy voice, flames flickering in his molten lava eyes. His scales are dark red and his tail starts to twitch in anticipation, sending coins scattering across the stone floor.
Boss Encounter
- Haze Bringer, Adult Red Dragon (lair), MM 98, Hard Difficulty (CR 24)
- HP: 310
- Proficiency Bonus: +6
- Spells: Level 5: Conjure Elemental; Level 3: Counterspell, Slow; Level 2: Misty Step; Level 1: Shield.
- Tactics: Haze Bringer will use Frightful Presence followed by Multiattack as his first action. After that he will use his breath weapon, repetitively as soon as it becomes available. He will then conjure an elemental or cast slow on as many adventurers as possible. The lair actions take a turn on initiative 20.
Notes
- The player’s best strategy is to lure Haze Bringer out into the Pyramid’s where they can draw power from the activated crystal.
- For an extra challenging boss (best for 5 level 14 characters) make Haze Bringer an Ancient Red Dragon.
Optional Story Twist
- If desired you can throw in a story twist. Raina Storm Crow is Haze Bringer, polymorphed into human form to deceive the adventurers. After years of dragons being murdered, she has lured the dragon slayers into her layer to exact revenge. The contract signed in blood at the beginning can be revealed as a curse which imposes some disadvantage on the players in the final boss battle (choose a disadvantage at your discretion, such as casting Dominate Person as a legendary action, forcing the players to use their abilities on each other). You may require the scroll be destroyed to lift the curse. This can be roleplayed starting with Raina Storm Crow in human form and as combat starts she transforms into Haze Bringer.
- Personally I think the twist is a bit obvious, so I like to run this adventure without it, a clean dragon slaying dungeon crawl.
Conclusion
Almost immediately as Haze Bringer takes his last breath the room starts to lighten. The sun is rising for the first time at Storm Spire in hundreds of years. The sunlight warms you and a smile appears on your exhausted face.
Outside the keep’s steep walls you ring the small bell that the lanky chauffeur handed you, what seems like weeks ago now. Almost immediately you see the old man and his carriage start crossing the bridge towards you from the east. As he pulls the horses to a halt in front of you, you consider just how tired and battered you feel. Having slain what is likely the last dragon left in the land, and the meanest you have ever encountered, what will you do next? Retire? Give your riches to charity? Open a winery? You are too weary to think about that now.
The man dismounts, folds down the latter, and opens the carriage door for you. “Enjoyed yourselves I see. Raina will be pleased.”
The End
Comments
Nov 16 2022
Where is the PDF link so we can download this for our gaming table?
Jul 29 2023
I've just published a number of improvements, additions, and fixes to this adventure in preparation for running it a second time with a new group.
Cheers!
Feb 9 2025
I've formatted this adventure into an organized and printable PDF! You can pick it up on our Patreon! (Link at the top).
In the process I also fixed a number of typos and grammatical errors, improved consistency, and a few technical mistakes.